Answer these simple questions and we will find you the BEST prices
Which type of solar quotes do you need?

Get Free quotes from loft conversion specialists near you

Save money by comparing quotes and choosing the most competitive offer

The service is 100% free and with no obligation
DIY Loft Conversion: How to Build a Loft Conversion (Guide)

- You can convert your loft yourself, but it depends on the complexity of the project and your level of skill and experience.
- Simple conversions, such as turning the loft into a storage space or a basic room, can be managed by a seasoned DIY enthusiast.
- More extensive conversions that require structural changes, plumbing, or electrical work often require professional help to ensure safety and compliance with building regulations.
Taking on a DIY loft conversion can be an appealing way to save money while adding valuable space to your home. However, if you're like many homeowners, you might find yourself uncertain about whether it's truly worth the effort, how much it will cost, and where to even begin.
The prospect of converting your loft on your own can be daunting, with questions around the complexity of the project, the required skills, and the potential hidden expenses that could arise along the way.
This guide will address these concerns. It provides clear, practical advice on budgeting for a DIY loft conversion and step-by-step instructions to help you navigate the process.
By the end, you'll have a better understanding of whether a DIY approach is the right choice for you and how to execute the project successfully if you decide to move forward.
Ready to get your loft conversion done? GreenMatch can help you get the best deal! Simply, fill out our 30-second form to receive up to three no-obligation, free quotes from our network of trusted local installers. Don’t waste hours searching installers on your own. Click below to get started.
- Describe your needs
- Get free quotes
- Choose the best offer


Can you do a loft conversion yourself?
Yes, you can do a loft conversion yourself with careful planning, time, and the right skills. If it's just for storage with minimal changes, you can likely handle it. However, if the project involves major structural work like altering the roof, reinforcing joists, or installing staircases, professional help is recommended to ensure safety and compliance.
Before deciding to undertake a loft conversion on your own, there are several critical factors to consider:
- Skill level: Assess your own experience and abilities honestly. Conversions that involve structural changes are not simple DIY jobs and should be approached with caution.
- Time and commitment: DIY loft conversions require significant time and effort. Consider whether you can realistically complete the project while balancing other responsibilities.
- Building regulations: Ensure you fully understand UK building regulations. Non-compliance can result in fines, legal issues, or having to redo the work.
- Cost vs. professional help: While DIY might save money upfront, consider the potential costs of errors or the need to hire professionals to fix mistakes. In many cases, investing in professional help from the start may be more cost-effective.
If you're uncertain about any aspect of the project, it's wise to hire professionals for specific tasks or even the entire project. This approach not only ensures that the work meets all necessary standards but also gives you peace of mind that the conversion is safe, functional, and up to code.
How to build a loft conversion
Undertaking a loft conversion is a significant project that requires careful planning, a good understanding of construction, and adherence to building regulations. While it’s recommended to hire a professional to ensure the project is completed safely and to a high standard, those who are experienced and confident in their skills may consider a DIY approach for a budget loft conversion.
Even if you plan to handle most of the work yourself, it’s advisable to hire professionals for the more complex parts of the conversion, such as structural alterations, electrical wiring, and plumbing. This approach reduces the risk of costly mistakes and ensures that your loft conversion meets all legal requirements.
Assuming you are undertaking a simple loft conversion, here are the DIY loft conversion step by step instructions:
Step 1: Establish if your loft is suitable for a conversion
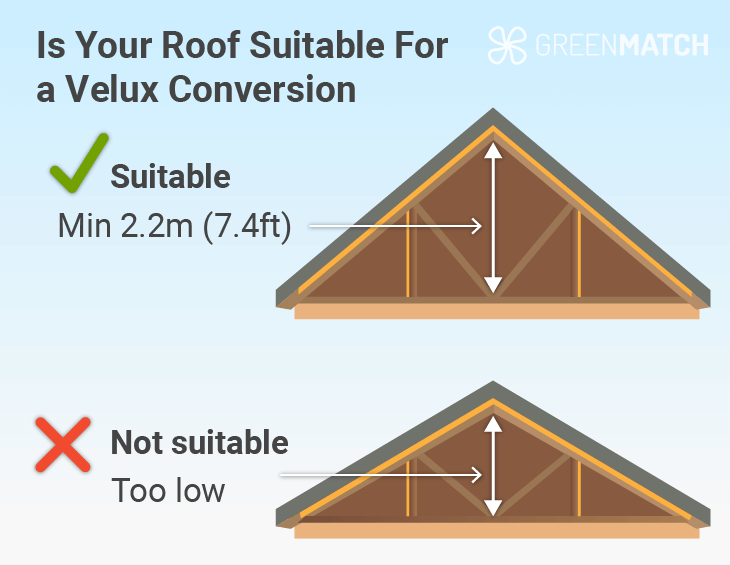
Before diving into the project, you must determine if your loft is suitable for conversion. Check the height of the space — ideally, you need a minimum height for a loft conversion of 2.2 metres.
Assess the roof structure and the overall condition of the space. Consider factors like the type of roof, the pitch, and any potential obstructions like chimneys or water tanks. If the space is limited or the roof requires significant alterations, it may be more challenging to convert without professional help.
If you choose to take on the entire loft conversion project yourself, proceed to Step 2. However, if you'd prefer to leave the more complex tasks to the experts, you might consider hiring professionals for a shell loft conversion. This way, they handle the structural work, and once completed, you can jump ahead to Step 8 to finish the interior yourself.
A shell loft conversion is a type of loft conversion where the structural framework and essential external work are completed by professionals, leaving the interior finishing to be done by the homeowner.
Essentially, the "shell" of the conversion is built, including the structural alterations, roofing, insulation, windows, and sometimes the staircase, but the interior tasks such as plastering, electrical work, plumbing, and decorating are left unfinished.
This approach is ideal for homeowners who want to save money by doing the interior work themselves or who want more control over the final design and finishes.
A shell loft conversion provides a middle ground between a full-service conversion and a DIY project, ensuring that the most complex and critical aspects of the construction are handled by experts while allowing the homeowner to take on the finishing tasks at their own pace.
Step 2: Choose a loft conversion type
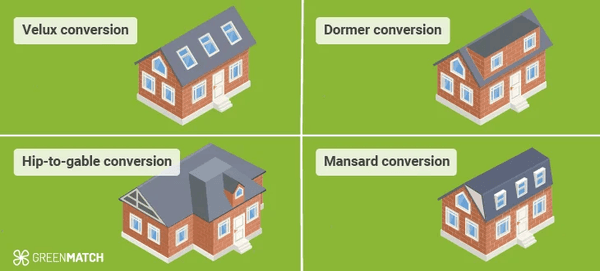
Selecting the right type of loft conversion is crucial. The choice depends on your budget, the type of house, and the desired use of the space. Common types include:
- Velux conversion: Involves adding windows without altering the roof structure. It's the most cost-effective option but offers limited additional space.
- Dormer conversion: Adds a dormer window to increase headroom and floor space. It’s a popular choice for most homes.
- Hip-to-gable conversion: Extends the roof by replacing the sloping end with a vertical wall, adding significant space. Suitable for detached or semi-detached homes.
- Mansard conversion: Involves a major roof alteration to create a nearly vertical wall and a flat roof. It offers maximum space but is the most expensive option.
If you're considering a loft conversion with a balcony, a dormer or mansard conversion is often the best choice, as these options can provide the additional headroom and external access needed to incorporate a balcony, enhancing both the functionality and aesthetic appeal of your new space.
Keep in mind that for bungalow conversions, the considerations are slightly different. Bungalows typically have a larger footprint but a lower roof height, so a hip-to-gable conversion can be an effective way to maximise the available space.
Step 3: Plan and design your loft conversion
Create a detailed plan for your loft conversion. This includes deciding on the layout, determining how the space will be used, and planning access points like stairs. Consider the placement of windows, insulation, and utilities like electricity and plumbing. Your design should comply with building regulations and, if needed, obtain planning permission.
At this stage, it’s advisable to consult with an architect or a loft conversion specialist to ensure your plans are feasible and meet all necessary standards.
You can consider using a DIY loft conversion kit. It is a pre-packaged set of materials and components designed to simplify the process of converting a loft into a usable space.
These kits typically include everything you need to carry out a basic loft conversion, such as structural elements, insulation, windows, flooring, and sometimes even staircases. The idea behind these kits is to provide a more straightforward, cost-effective solution for homeowners who want to undertake a loft conversion themselves without having to source all the materials individually.
The kits are usually tailored to specific types of loft conversions, such as Velux or dormer loft conversions, and come with detailed instructions to guide you through the installation process.
However, while a DIY loft conversion kit can make the project more manageable, it's still important to have a good level of DIY skills and knowledge of building regulations to ensure the conversion is safe and compliant. Additionally, some tasks, like structural modifications or electrical work, may still require professional assistance.
Step 4: Clear the loft space
Start by clearing out the loft space. Remove any old insulation, debris, and obstructions to create a clean and safe working environment.
This step is essential to get a clear view of the existing structure and identify any potential issues that need to be addressed.
If you're planning a DIY loft conversion for storage, this initial clearing process is particularly important. It allows you to assess the space and plan the most efficient layout for your storage needs, ensuring that the area is both functional and secure.
Step 5: Strengthen the floor joists
Reinforce the floor joists to support the additional weight of the conversion. This step is critical to ensure the safety and stability of the new space. Installing stronger joists may involve adding new beams or reinforcing the existing ones.
It's important to consult a structural engineer if you're unsure about the required support.
To ensure you get the best value and quality, it's advisable to obtain multiple quotes from different professionals. This not only helps you compare costs but also allows you to evaluate the experience and expertise of each contractor, ensuring that your loft conversion is both safe and cost-effective.
Fill out our quick 30-second form to receive up to three no-obligation, free quotes from our network of trusted local installers specifically tailored to your project needs.
Click below to begin!
- Describe your needs
- Get free quotes
- Choose the best offer
Step 6: Install insulation
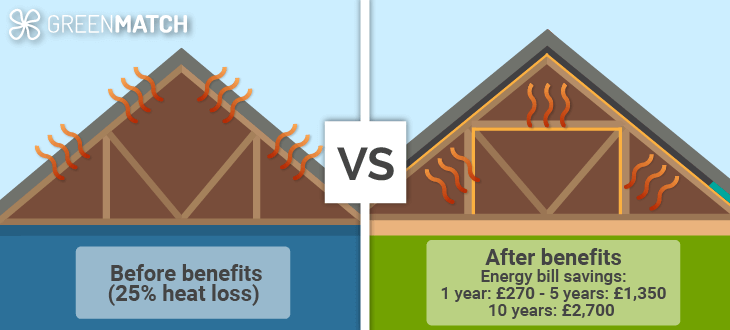
Proper insulation is vital for making your loft conversion comfortable and energy-efficient. Install insulation between the rafters, under the floorboards, and around the walls. This will help regulate the temperature and reduce energy costs.
Use high-quality insulation materials that meet UK building regulations. These include PIR boards, mineral wool, sheep's wool, and multifoil insulation, all of which offer excellent thermal efficiency and soundproofing for loft conversions.
Step 7: Install windows and ventilation
Add windows to your loft conversion to bring in natural light and ensure proper ventilation. Choose between roof windows, dormers, or even full-height glazing depending on your design.
Properly sealed windows are essential to prevent drafts and moisture issues.
Step 8: Conduct electrical and plumbing work
If your loft conversion includes electrical installations or plumbing for a bathroom, now is the time to carry out this work. This step requires hiring certified electricians and plumbers to ensure the work is safe and compliant with regulations. This is particularly important for tasks like wiring, lighting, heating, and water supply.
When choosing an electrician, ensure they can provide BS7671 test certificates after installation, as recommended by Oakwood Lofts, to confirm compliance with safety regulations.
Step 9: Build internal walls and ceiling
Construct any necessary internal walls using stud frames, and then add plasterboard to the walls and ceiling. This is where your loft begins to take shape. Insulate behind the plasterboard to enhance energy efficiency and soundproofing.
Step 10: Install stairs
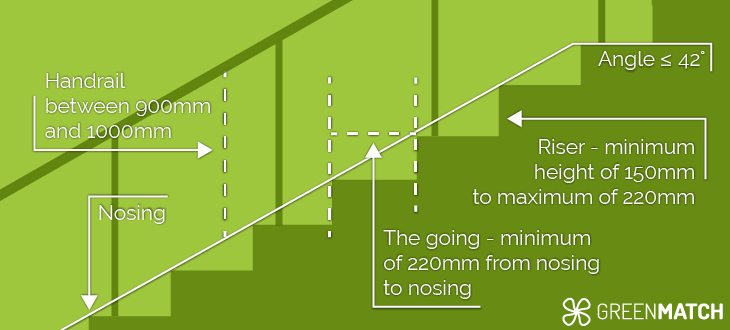
Install a staircase to provide access to your new loft space. The design and positioning of the stairs must comply with building regulations, considering both safety and practicality. Choose a staircase style that fits within your design and space constraints.
According to Resi architect studio, the ideal placement for your new staircase is directly above your existing stairs. This approach not only optimises space but also creates a cohesive look, making the new staircase appear as if it has always been part of your home.
Step 11: Finish the interior
Complete the interior by adding the final touches. This includes painting, decorating, and installing fixtures like skirting boards and lighting. Ensure that all elements are securely installed and meet your design specifications.
Step 12: Final inspection and compliance check
Before you begin using your new loft, have it inspected by a qualified professional to ensure that it meets all building regulations and safety standards. This final step is crucial to confirm that your loft conversion is safe, functional, and legally compliant.
It’s important to remember that in the UK, it is illegal to convert a loft without adhering to building regulations. Failing to comply can result in legal penalties, difficulties in selling your property, or even being required to undo the work. Ensuring your loft meets all necessary standards not only protects your investment but also guarantees the safety and integrity of your home.
DIY loft conversion cost in the UK
On average, a DIY loft conversion can cost between £15,000 and £40,000. This range covers basic to moderately complex conversions, with the final price depending on factors such as materials, the need for structural alterations, and whether you need to hire professionals for specific tasks.
Here is the average cost per type of loft conversion:
| Type of conversion | Average DIY cost range |
|---|---|
| Velux loft conversion | £10,000–£15,000 |
| Dormer loft conversion | £20,000–£30,000 |
| Hip to gable loft conversion | £25,000–£35,000 |
| Mansard loft conversion | £30,000–£40,000 |
These costs are approximate and can vary based on location, the quality of materials, and the complexity of the project. While a DIY approach may reduce labour costs, it’s important to factor in the potential need for professional assistance, especially for tasks like electrical work, plumbing, and structural modifications.
When budgeting for a self build loft conversion, it's also wise to include a contingency fund to cover unexpected expenses, which are common in large home improvement projects.
Choosing sustainable materials, energy-efficient insulation, and eco-friendly finishes for your loft conversion can improve its quality and long-term benefits. While these options may have a higher upfront cost, they can reduce energy bills and lower your carbon footprint over time. Incorporating sustainable practices into your DIY loft conversion is a smart investment that benefits both your home and the environment.
Pros and cons of a DIY loft conversion
Deciding to undertake a DIY loft conversion is a significant decision that comes with its own set of advantages and challenges. While the idea of transforming your loft into a usable space can be appealing, it’s important to weigh the pros and cons carefully to determine if this approach is right for you.
Pros of a DIY loft conversion
A DIY loft conversion offers several compelling benefits that make it an appealing choice for those willing to take on the challenge. Here are the most prominent ones:
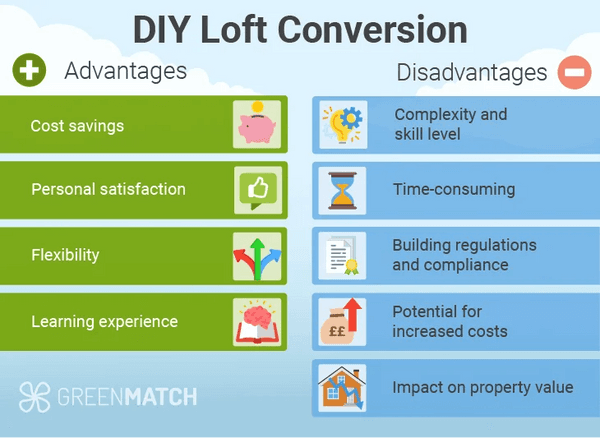
- Cost savings: One of the main advantages of a DIY loft conversion is the potential for cost savings. By eliminating labour costs, you can significantly reduce the overall expense of the project. This makes it an attractive option for homeowners on a budget.
- Personal satisfaction: Completing a loft conversion yourself can be incredibly rewarding. The sense of accomplishment that comes from transforming a space with your own hands is unmatched, and it allows for a personal touch that you might not get with a professional contractor.
- Flexibility: A DIY approach gives you full control over your loft conversion's timeline and design choices. You can work at your own pace, make adjustments as you go, and create a space that perfectly fits your vision and needs.
- Learning experience: Taking on a DIY loft conversion can be a valuable learning experience. You'll gain new skills and knowledge about construction, which can be beneficial for future home improvement projects.
Cons of a DIY loft conversion
While a DIY loft conversion can be a rewarding and cost-effective project, it's important to be aware of the potential downsides:
- Complexity and skill level: Loft conversions are complex projects that often require a high level of skill and experience. Structural alterations, electrical work, and plumbing are just a few areas where mistakes can be costly and dangerous. Without the necessary expertise, you risk compromising the safety and quality of the conversion.
- Time-consuming: DIY loft conversions can be time-consuming, especially if you're balancing the project with other responsibilities. What might take a professional team a few weeks to complete could take you several months, leading to prolonged disruption in your home.
- Building regulations and compliance: Ensuring your loft conversion meets UK building regulations is critical. A conversion that isn’t up to code can decrease your property’s value and may require costly modifications to bring it up to standard. Non-compliance can also lead to legal issues, fines, or even the need to undo the work.
- Potential for increased costs: While the initial goal of a DIY project is to save money, unexpected challenges and mistakes can lead to increased costs. Hiring professionals to fix issues or complete tasks that are beyond your skill level can quickly eat into your budget.
- Impact on property value: A poorly executed loft conversion, or one that doesn’t comply with regulations, can negatively affect your property’s value. Potential buyers may view it as a liability, leading to reduced offers or difficulties in selling the property.
These challenges become even more pronounced when attempting a large project like a master suite loft conversion. The complexity and scale of such a conversion often require professional expertise to ensure that the space is functional and safe.
Taking on a project of this magnitude as a DIY effort can be overwhelming, and the risks of costly mistakes or prolonged timelines increase significantly. For such substantial renovations, the guidance and skills of experienced professionals are usually indispensable to achieving the desired outcome without compromising on quality or safety.
Is a DIY loft conversion a good option for you?
Deciding whether a DIY loft conversion is the right choice for you depends on several factors, including your budget, skills, and the complexity of the project.
While a DIY approach can offer substantial cost savings, it's important to consider all your options before committing to such an undertaking.
If your primary goal is to reduce costs, you might want to consider a professionally done Velux conversion. A Velux conversion, which involves installing roof windows without altering the roof structure, is typically the most affordable option. By opting for professional installation, you can ensure that the work meets all building regulations and is completed to a high standard, reducing the risk of costly mistakes.
Alternatively, if you're comfortable with handling certain aspects of the project yourself but unsure about the more complex tasks, a hybrid approach may be ideal. For example, you could hire professionals to handle the structural work, electrical wiring, and plumbing while you take on simpler tasks such as laying laminate flooring, painting, and decorating. This allows you to save money on labour while still ensuring that the critical components of your loft conversion are done correctly.
Ultimately, a DIY loft conversion can be a rewarding project if you have the necessary skills, time, and resources. However, if you’re unsure about your ability to manage the entire process, it’s wise to consider hiring professionals for at least some parts of the job. This approach can help you achieve a high-quality result without overextending yourself.
Before making your final decision, it’s essential to gather multiple quotes from local professionals. This will give you a clear understanding of the costs involved and help you make an informed choice that balances your budget with the quality and safety of the finished conversion.
By obtaining several quotes, you can compare options and find the best fit for your needs, ensuring that your loft conversion is both a practical investment and a valuable addition to your home.
Fill out our quick 30-second form to receive up to three no-obligation, free quotes from our network of trusted local installers specifically tailored to your project needs.
Click below to begin!
- Describe your needs
- Get free quotes
- Choose the best offer
FAQ
We strive to connect our customers with the right product and supplier. Would you like to be part of GreenMatch?
