Answer these simple questions and we will find you the BEST prices
Which type of solar quotes do you need?
It only takes 30 seconds
100% free with no obligation

Get up to 3 quotes by filling in only 1 quick form

Independent and unbiased

Reduce your energy bills
- GreenMatch
- Conservatory
Conservatory Styles, Roofs and Materials: A Complete Guide


A conservatory is a great addition to your home. It can provide you with more space and give bigger value to your property. A good conservatory can even be energy efficient and help you save on your heating bill, and make your lifestyle more green.
On this page you can find everything you need to know about conservatories, this includes the different conservatory designs and materials for both roofs and walls. We will also give you the best tips on how to improve your already existing conservatory.
Do you already know what kind of conservatory you want for your home, and are just looking for the best price? Let us help you! We will put you in contact with up to 3 certified installers, they will provide you with their best quotes on the conservatory you want.
You can then compare the conservatory quotes and choose the one that fits your needs and budget best. The quotes are free and with no-obligation.
- Quotes from local engineers
- Payment by finance available
- 100% free and no obligation
It only takes 30 seconds


Modern conservatory styles
Conservatories in the UK come in many different styles and designs. Many designs take inspiration from historic periods, while other designs are made with focus on functionality. Many installers offer an extensive range of designs. In the following sections we describe the most popular conservatory styles in the UK.

Victorian Conservatory

Edwardian Conservatory

Lean-to Conservatory
Victorian conservatory
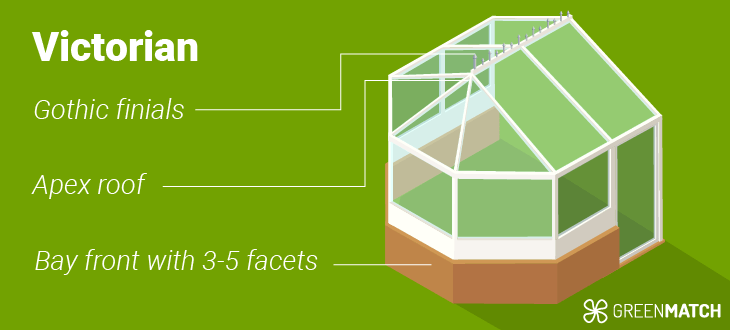
The Victorian conservatory is one of the most popular styles of conservatories in the UK. The Victorian style conservatory has a bay front, often a tall peaked roof, and many glass panels. This kind of conservatory comes in 2 different styles:
- The 3-facet Victorian style has three main windows, these are widely angled to give maximum space and light.
- The 5-facet Victorian style features five main windows in the bay front. This gives additional space and creates a period profile that blends space and a classical look.
You can have this kind of conservatory as a brick conservatory in part of the building. If you add glass with double glazing, you will ensure that your home and conservatory will be energy efficient and still reduce your heating bills.
Edwardian conservatories
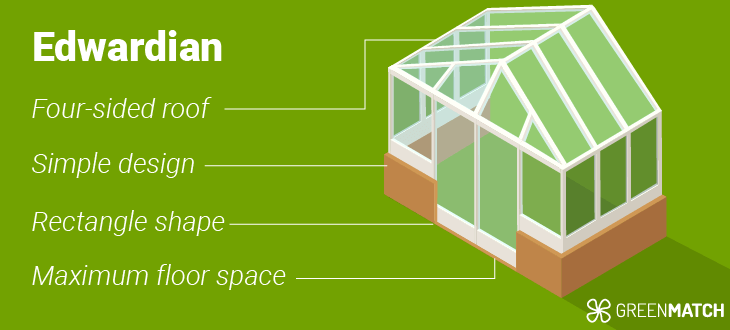
An Edwardian conservatory with the rectangular shape and the peaked roof is a great addition to your home. It grants plenty of space and gives great value for money. With the square style this kind of conservatory can fit well into most homes.
The adaptability of this kind of conservatory makes it able to fit most house styles and bungalows.
As with other kinds of conservatories an Edwardian conservatory will work great as a buffer zone for your home, collecting the heat that might escape. This makes a conservatory a great energy efficient investment, especially if you choose materials such as tiles and brick.
Lean to conservatory
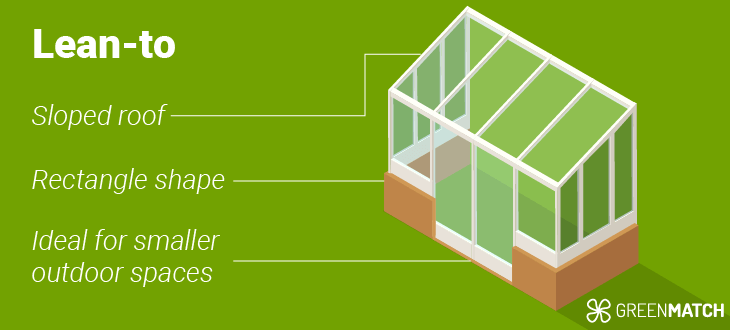
A lean to conservatory is one of the conservatories with the most simple shape. It is also the one style that often has the lowest price point. This makes a lean to conservatory a good option for most budgets.
The small conservatory is ideal for homes with smaller garden space due to the one-sided roof of this conservatory.
It is possible to add solar panels in the UK to the roof of a modern lean to conservatory, especially if the conservatory is south-facing you can benefit a lot from the sun’s rays.
P shaped conservatories
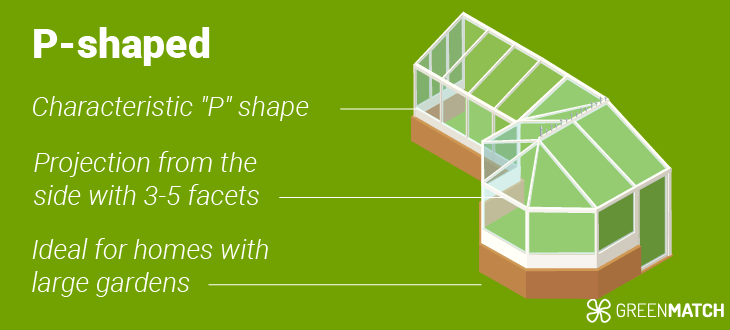
A P-shaped conservatory can be designed to be a large conservatory or a smaller one, depending on what you want. This kind of conservatory will often have a victorian style conservatory as the rounded part. For the straight part it can be either an Edwardian style or a lean on style.
T shaped conservatory
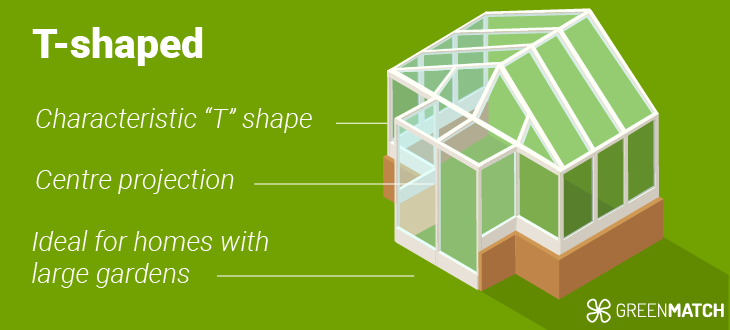
A glass conservatory such as a t-shaped conservatory is a great solution as an additional living space to your home. The shape is often made in a Victorian style and the centre of the shape will most likely include french doors, to get the most out of the weather on warmer days.
Orangery
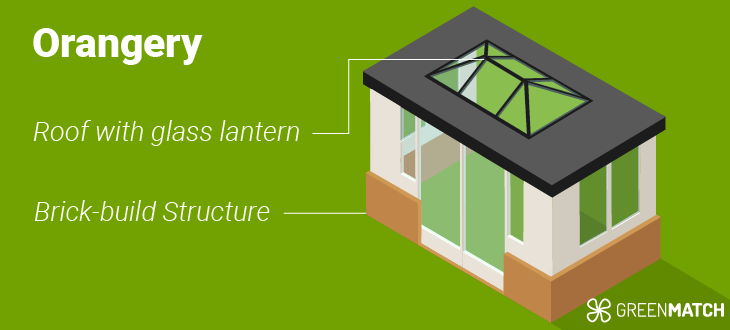
An orangery is also a kind of conservatory. Should you compare orangery vs conservatory the main difference is that orangeries is a mainly brick-build structure with large windows, while a conservatory often is a fully glazed structure with dwarf walls of brick structure at the base.
If you prioritise good insulation within your orangery and add solar panels to the roof you will have an addition to your home that is keeping your heat inside and providing your home with green energy.
Whether the conservatory companies near you also do orangeries is something that you will need to make a specific inquiry about.
For conservatory installation you should always compare prices from multiple installers, this will ensure that you don’t overpay for your replacement conservatory or your new one. At GreenMatch we can shorten the process of finding good installers in your area.
With our service you’ll receive up to 3 quotes from certified installers, this will give you the chance to compare the offers and choose the one that best fits your needs and budget.
The service is free and with no obligation.
- Quotes from local engineers
- Payment by finance available
- 100% free and no obligation
It only takes 30 seconds


Conservatory roofs
For your new conservatory installation you have a few different roof options. Among the most popular options for conservatory roofs are tiled roofs, glass roofs and polycarbonate.
In the following sections you can learn the pros and cons of these three popular choices.
Solid tiled roof

A tiled roof conservatory often has the best thermal insulation compared to glass roofs. This makes this kind of roof perfect if you want an extra level of warmth.
With a tiled roof you can use the living area of your conservatory year round. It is easier to match the conservatory to the rest of the house, by using the same kind of tiles. As it can be matched with the current structure it will be a home extension that adds great value to your home.
✅ Thermal efficiency
✅ Part of the house
✅ Add value to your home
⛔️ Lack of light
⛔️ Higher costs
There are some cons that you should consider when you choose a tiled roof for your conservatory. Compared to a glass roof, a tiled roof will give you less natural light; this could make the conservatory less attractive during the darker months. Compared to a polycarbonate roof there will be higher costs with a tiled one.
A tiled roof is often used as a replacement for a glass or polycarbonate roof when these break, this would then be an extra expense, if you choose a tiled roof from the start the extra expense will not be an issue.
Glass roof

One of the biggest concerns of conservatories with glass roofs is the heat loss that can possibly happen with having so much glazing installed.
The technology of double glazing has developed a lot and today you can get a glass roof with double glazing that will be thermal efficient and provide insulation.
With a glass roof on your conservatory you have a lot of natural light coming in, making it attractive both during winter and summer. With durable quality glass you will have a conservatory roof that will last 20-30 years without the need of replacement. Since glass roofs are among the most popular choices, it will be easy to find an installer for your project.
✅ Natural light
✅ Durable
✅ Easy installation
⛔️ Expensive
⛔️ Temperature regulation
If you want double glazing on your whole glass roof, it can be expensive, especially compared to a polycarbonate roof. It is worth mentioning that even though glass might be a little expensive, the cost-per-year will often make the investment in glass roofs worth it.
Even though the technology of modern double glazing has come a long way it is still hard to regulate the temperature within a conservatory with a glass roof. It will often become too hot during the summer and cold during the winter.
With a glass roof you have many different glass type options, using low E, or even better Solar Control glass, is important for keeping good thermal insulation. This type of glass reflects or absorbs a portion of the sun's energy before it enters the conservatory, keeping it cool and providing a comfortable indoor environment.
Choosing laminated or toughened glass are almost a must when choosing a glass roof since they have higher security features compared to other types of glass.
Due to its height and position self-cleaning glass can really be helpful for glass conservatory roofs.

Polycarbonate conservatory roof
A polycarbonate roof for your conservatory will often be the most affordable option. It is also one of the most popular options for conservatory roofs in the UK. While it is the more affordable option there are also some downsides to this material.
We have listed the pros and cons of conservatories with polycarbonate roofs.
✅ Cheap
✅ Easy to shape and install
✅ Design options
⛔️ Regulation of heat
⛔️ Unappealing
⛔️ Noisy
While polycarbonate might be the cheapest option, it lacks durability and will need replacement. The material will be able to fit onto most conservatories due to the flexibility of the material.
With the polycarbonate material you will have the option of choosing the transparency of the material all depending on how you want to regulate the level of light and temperature within the conservatory.
As a cheap option you will find that a conservatory with a polycarbonate roof will have trouble regulating the heat, making it almost sauna-like inside during hot days. Clear plastic will have a glass-like look, but the material can often still look cheap and tacky.
You can prevent the regulation of heat by using window film, this will reflect the sun's rays and energy, adding this will affect the overall price.
When rain hits the plastic roof it can cause a lot of noise, depending on how heavy the rain is this can be too noisy to enjoy your conservatory. This makes polycarbonate roofs especially inconvenient in conservatories in Scotland and other areas that experience a great amount of rain.
Hybrid conservatory roof
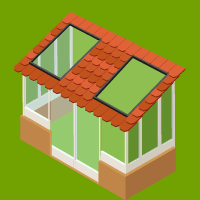
As for materials for your conservatory roof a hybrid version has become a more and more popular option. With a hybrid roof you mix multiple materials, this will often be glass and tiles. This gives both good conditions for insulation and natural light within the conservatory.
A hybrid roof will provide your conservatory with a more extravagant feeling, it will add a lot of value to your home, and will last a long time. Opting for a hybrid roof will mean no compromise. You will have the outdoor feeling with natural lights, while still being able to enjoy the warmth or cool within the conservatory.
With a hybrid roof you will have more options of customising the design of the roof, adding custom tiles or spotlights.
✅ Grand looking
✅ No compromise
✅ Customisable
⛔️ High cost
A hybrid roof will be the most expensive option; the addition of ceiling lights and tiles will be more expensive than just a glass roof or polycarbonate roof. Whether this kind of roof is something you will prioritise, make sure that you have a budget that allows it.
Pitched and sloped roof

As for the style of roof for your conservatory you have the options of a pitched/sloped roof or a flat roof. Since most traditional styles of conservatories have a pitched roof as seen on e.g. Victorian conservatories and lean to conservatories, this kind of roof is the most common.
One of the reasons that a sloped roof is often preferred over a flat roof conservatory is that flat roofs can have issues with leaks and drips.
Flat roof conservatory

A conservatory with a flat roof can be a great solution for homes with overlooking windows, where height is an issue or bungalows.
With a flat roof there can be concerns of leaks and drips, this can often be solved with the right materials and structure. Most flat roofs will have a small slope that will make discharging of water easier.
Conservatory thermal roof
If you opt for a tiled roof to your conservatory it will be insulated from the get go. This is why a tiled roof will be the most energy efficient solution. Should you opt for a glass roof, you should make sure that the glass is either with double or triple glazing, this will help and strengthen the insulation.

For a polycarbonate roof the U-value will often be really low compared to the value of a normal house. A polycarbonate roof will never be well insulated, for good insulation you will most likely need to replace the roof completely.
For the price of your desired roof or a complete conservatory you should always compare quotes from more than one installer, this will ensure that you don’t overpay for your new conservatory.
Rather than scouring the internet for good local installers we at GreenMatch can provide you with quotes from up to 3 installers in your area. This will save you plenty of time and money. Start the process by clicking the button below:
- Quotes from local engineers
- Payment by finance available
- 100% free and no obligation
It only takes 30 seconds


Conservatory materials
For the best conservatory roof materials you will often have the options of three kinds of materials:
These types of materials all work great for a conservatory, but there are some advantages and disadvantages that you need to consider when choosing the material.
uPVC conservatories

A uPVC conservatory will provide you with a lot of comfort and safety while not breaking the bank. Apart from the low price a uPVC conservatory comes with some more benefits including:
- Low maintenance: With uPVC all you need to clean and maintain the material is a damp cloth, this makes it easy to actually do maintenance on your conservatory.
- Long-lasting: With uPVC being a durable material with no possibility of rot or warp, a conservatory in this material will last you a long time. For materials of the highest quality you can expect a lifetime of at least 35 years.
- Energy efficient: uPVC is a great material for insulation as well. The material does not conduct heat. This keeps the heat within your home so you don’t waste energy and money.
- Versatile: The uPVC material can come in many different colours and can even be made to resemble wood. You have lots of options for how you want your conservatory to look.
While uPVC comes with a lot of benefits there are also some disadvantages or some things to be aware of if you choose uPVC as the material for your conservatory:
- Brittle: uPVC is very durable but can become brittle over time, especially if it is of lower quality. Under impact there might be a chance that it can shatter or splinter.
- Cheap-looking: Compared to materials like wood and aluminium uPVC might look cheap. With the versatility of the material where you can choose different colours, this can be dealt with.
- Not environmentally friendly: The production of uPVC is cause for carbon emissions, and the material is not biodegradable.
While uPVC has great benefits it is worth noting the disadvantages of this material before making a conservatory with it.
Aluminium conservatories

As for aluminium conservatories, these come with a lot of pros, but there are also some cons with this material that you should consider before choosing this as the material of your conservatory.
The advantages include:
- Long-lasting: Aluminium as a material is a long-lasting one and with the durability of the material as well, you will have an aluminium conservatory for many years.
- Strong: Even though aluminium is a light-weight material it is a strong one. With an aluminium conservatory you can have it as tall as you want and still have thin frames.
- Recyclable: Aluminium is a 100% recyclable material. When you’re done with it it can be reused or melted down to make something new.
While there are great advantages of aluminium it is not a perfect material, it also has some disadvantages, these include:
- High cost: Aluminium is not cheap and will cost significantly than polycarbonate.
- Inefficiency: If the aluminium used is of poor quality this will make the framing inefficient. As aluminium conducts heat, poor quality materials will allow for heat to escape your home.
As aluminium is one of the most expensive materials for a conservatory you need to be aware of the advantages and disadvantages so you are prepared if you make this kind of investment.
Wood conservatories

For wood or timber conservatories you will be sure to have a long-lasting conservatory with a great finish. These are only some of the pros with wood conservatories, others include:
- Quick construction: Timber is easy to adjust onsite, and quick to put together. This makes the process of a timber conservatory a quick one.
- Customisable: With a wood frame you have the option of choosing your colour and look, this makes it easy to make a unique conservatory.
While a wood conservatory can be a quick process and give you the opportunity of making a unique extension to your home there are some drawbacks of this material, these includes:
- Wood rot: Even though it is uncommon there are still the issue of wood rot. This can especially happen if your conservatory is not installed properly.
- Fire hazard: While you can treat wood to reduce the fire hazard, the material will still be very flammable.
A wood conservatory of high quality will provide you with a unique home improvement that you can use for a long time.
Conservatory prices will depend on the materials, size and style you want. For the best price it is recommended that you always collect quotes from multiple installers so you can compare and minimise the risk of overpaying.
To make this process easy and less time consuming we will put you in contact with up to 3 installers, that each will give you their best deal, and you only have to choose the one that fits you the best. This is free and with no obligation.
- Quotes from local engineers
- Payment by finance available
- 100% free and no obligation
It only takes 30 seconds


Ways to improve an existing conservatory
If you have an old conservatory and want to upgrade it, so you can keep enjoying it, there are some smaller upgrades that will make your old conservatory better suited to your current needs.
Some of these might even save you some money.
- Double glazing: If your conservatory or orangery is of a later date then you will probably benefit from replacing the glasses with double glazing. The glazing technology has been greatly developed in the last couple of years. With double glazing you will be able to keep your conservatory warm during winter and cool during summer.
- Insulation: If you want to enjoy your conservatory year round, it might be time to invest a little more in insulation materials. With good insulation you will be able to enjoy your space even when the snow is falling outside.
- Upgrade the roof: One way of ensuring better insulation is by upgrading the roof. If your roof is of polycarbonate material, a shift to double glazing glass will make a great difference, and if you opt for a tiled roof you will feel an even bigger difference.
- Update old frames: Old uPVC frames will start to look dirty and worn out, if not cared for properly, by updating them you will give your conservatory a fresh new look. The technology of uPVC has been greatly upgraded, replacing the frames will secure better insulation and safety in your conservatory.
With some small upgrades you can come a long way while still keeping your old conservatory. These upgrades will cost you a lot less than investing in a completely new one.
Want to find the best conservatory options in your region? Take a look at local conservatory pages:
Get the best conservatory prices
When making bigger home improvements or other home extensions it is always recommended that you collect quotes from a few different installers.
Since the cost of these kinds of upgrades and installations can be vastly different from installer to installer you will greatly benefit from comparing quotes side by side.
Finding the right installer in your area can be difficult let alone time-consuming to save you both time and money we suggest that you use our free no obligation service.
With this service we will put you in contact with up to 3 installers in your area. They will each give you their best quote and you just have to choose the one you find to be the best.
All in all it’s a super quick and easy process that will ensure you get the best deal on your new home upgrade. You can start the process by clicking the button below.
- Quotes from local engineers
- Payment by finance available
- 100% free and no obligation
It only takes 30 seconds


Conservatory FAQs
You do need planning permission if the conservatory covers more than 50% of the area around the original house and further if the extension is located on sides that face onto the road. For exact rules in your area, you should contact your local authority.
The cost of a conservatory depends on the type of materials, design and size you want. To get the best price it is always recommended to compare multiple quotes from different installers so you don’t overpay.
If the construction of your conservatory is not done right, you can risk it devaluing your house. You should always opt for materials of highest quality and consult a certified installer before you start your project.
Among the most popular styles of conservatories you will find the victorian style and the lean to. For a list of the different types of conservatories click here.
If you do not prioritise good insulation in your conservatory the extension will be cold during winter. There are multiple ways that you can upgrade the insulation for your conservatory.

Since 2022, Nikita’s mission as a GreenMatch writer is to make eco-living easy. She simplifies renewables, empowering everyone to embrace a greener, brighter future.

We strive to connect our customers with the right product and supplier. Would you like to be part of GreenMatch?

